
- A tomcat 9 server with required libraries, and base configurations
- The FlexDeploy WAR
- The FlexDeploy database installation scripts
- The FlexDeploy database migration scripts (for upgrading an existing FlexDeploy Tomcat installation)
- The FlexDeploy plugins
Requirements
See FlexDeploy System Requirements for details on software and hardware requirements
Installation Instructions
Adjust for Windows path if you are installing on Windows platform.Step 1. Ensure Java 21 or 17 is installed on the server.
In this example, JAVA_HOME is /u01/java/jdk21 but it can be any path you want.Step 2. Prepare software
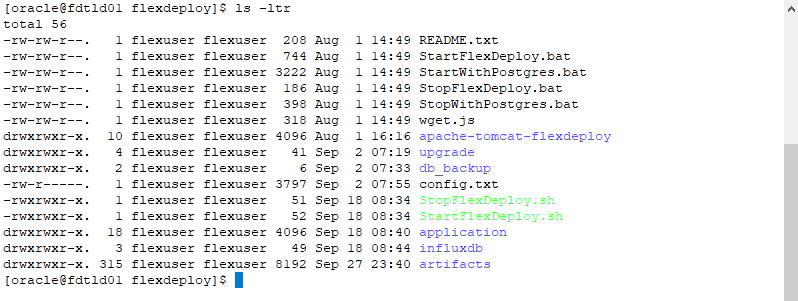
FlexDeploy can be downloaded from the Flexagon Support Site. You will download specific version of FlexDeploy, download file is named Tomcat_Complete-X.X.X.X.zip, where X.X.X.X represents four digit version number. Extract the zip file in the desired location (referred to as “FLEXDEPLOY_HOME” in this document). See example below, where zip was extracted in /u01/flexdeploy folder.We recommend use of folder structure without any space in name.
Step 3. Setup database and schemas
Setup the appropriate database, if you not already done so. Manual Installation Instructions - Database Tier - Oracle Manual Installation Instructions - Database Tier - PostgreSQLStep 4. Update Tomcat context.xml
Modify Tomcat configuration file (context.xml) for database connectivity depending on your database type.- Replace the contents of context.xml with the contents the context-<type>.xml if using PostgreSQL.
- Replace URL and Password with the actual values.
Example JDBC URL (CONNECT_STRING)
-
Oracle
-
The JDBC short format of host:sid:port should not be used. URL must be in the format listed below as we are requiring use of UCP based connection pooling.
-
Example -
jdbc:oracle:thin:@(DESCRIPTION=(ADDRESS_LIST=(ADDRESS=(PROTOCOL=tcp)(HOST=**HOSTNAME**)(PORT=**PORT**)))(CONNECT_DATA=(SERVICE_NAME=**SERVICE_NAME**))) - If RAC is used for the database, multiple nodes can be listed in the address list of the URL or it can point to the scan listener for the cluster. See below sample URL for a RAC implementation that has a primary and secondary scan listener connecting to to a service name GOLD-CLOUD. This includes connection timeout, retry, and retry delay settings.
-
Example -
jdbc:oracle:thin:@(DESCRIPTION = CONNECT_TIMEOUT=120) (RETRY_COUNT=20) (RETRY_DELAY=3) (TRANSPORT_CONNECT_TIMEOUT=3) (ADDRESS_LIST =(LOAD_BALANCE=on) (ADDRESS = (PROTOCOL = TCP) (HOST=primary-scan) (PORT=1521))) (ADDRESS_LIST =(LOAD_BALANCE=on) (ADDRESS = (PROTOCOL = TCP) (HOST=secondary-scan) (PORT=1521))) (CONNECT_DATA=(SERVICE_NAME = gold-cloud)))
-
Example -
-
The JDBC short format of host:sid:port should not be used. URL must be in the format listed below as we are requiring use of UCP based connection pooling.
-
PostgreSQL
- Syntax - jdbc:postgresql://hostname:port/flexdeploy
-
Example -
jdbc:postgresql://dkrlp01:5432/flexdeploy - If you are using database name other than flexdeploy, then update URL accordingly.
Oracle
PostgreSQL
Step 5. (Optional) Update Tomcat server.xml
Modify Tomcat server.xml if necessary. If you want to use different port or setup https, the you would need to update server.xml. File - <FLEXDEPLOY_HOME>/apache-tomcat-flexdeploy/conf/server.xml- By default, the Tomcat server is configured to run on port 8000. If this port is in use, change to some other unused port. Search for <Connector port=“8000” protocol=“HTTP/1.1” if you want to change it.
- There are other ports referenced in the server.xml file as well. If the logs contain a port in use error, you can find the open ports on your machine and then search this file for ports that you find are in use and change them.
Step 6. (Optional) Update setenvoverride
Modify Tomcat Environment script (setenvoverride.sh or setenvoverride.bat) for FlexDeploy server side directories, memory specifications or JAVA_HOME. File - <FLEXDEPLOY_HOME>/apache-tomcat-flexdeploy/bin/setenvoverride.sh (setenvoverride.bat on windows). Main reason to modify this file is to configure specific JAVA_HOME. Other variables can be left as is for default configurations.- Configure variable JAVA_HOME to use specific version of Java for FlexDeploy tomcat process.
- Configure variable FD_APPLICATION_DIRECTORY with directory to use as the FlexDeploy application directory (See System Requirements for more information about how much space is needed.)
- Configure variable FD_REPOSITORY_DIRECTORY with the directory to host the FlexDeploy artifact repository (See System Requirements for more information about how much space is needed.)
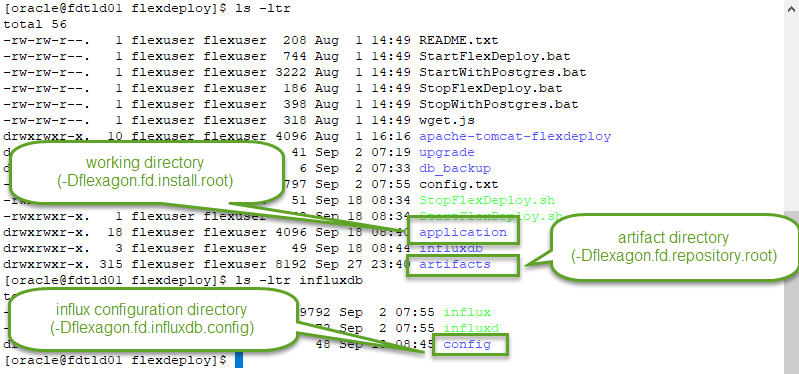
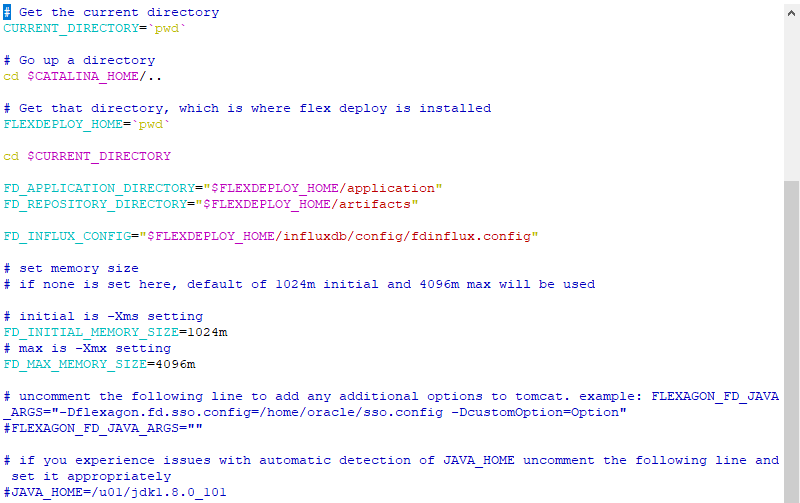
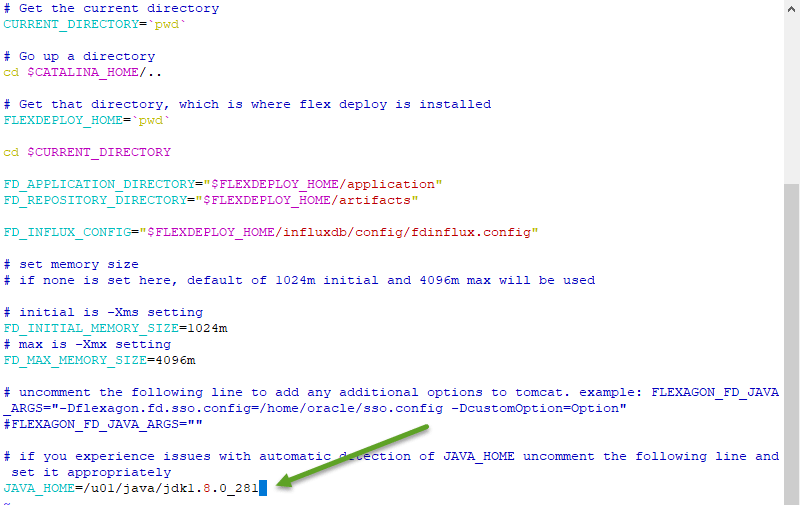
Modify Tomcat Environment script (setenvoverride.sh or setenvoverride.bat) for JAVA_HOME. File - <FLEXDEPLOY_HOME>/apache-tomcat-flexdeploy/bin/setenvoverride.sh (setenvoverride.bat on windows)
If JAVA_HOME is already set in your environment, you can skip this step.Unix Example - JAVA_HOME=/u01/java/jdk21Windows Example - set JAVA_HOME=c:/installs/Java/jdk21
Step 7. Update database driver (Only if using Oracle Database)
- Download the latest Oracle JDBC driver from https://www.oracle.com/database/technologies/appdev/jdbc-downloads.html. Click on the driver link matching your Oracle database version, and download the driver compatible with your JDK. For example,
ojdbc8-full.tar.gz.
Be sure to download the JDBC driver matching your Oracle Database version and one which is compiled and compatible your Java version. If you download the driver which is compiled with a newer JDK you will get errors on server startup similar to the following:
- Clean up old ojdbc jars from <FLEXDEPLOY_HOME>\apache-tomcat-flexdeploy\lib.
- Save new driver jars from downloaded jdbc driver to <FLEXDEPLOY_HOME>\apache-tomcat-flexdeploy\libext. You may have done this already as part of Step 4. Make sure that if you copied the jars for libext of your backup to your new libext, you don’t end up with multiple versions of the Oracle JDBC jars. If migrating from an old version of FlexDeploy, you may want to clean your libext folder and start with a new Oracle Database driver download.
- UCP is now required for Oracle Database connections.
Linux
Windows
Step 8. Set execute permission (Linux only)
Set the shell scripts executable with this command.Step 9. Adjust for non-default server side directories
Skip this step if you did not modify setenvoverride for FD_APPLICATION_DIRECTORY in Step 6.
Step 10. Configure Influx database
This is a required step that must be executed.
Linux
ulimit -Hn
will show the open file limit for the current user. Make sure you run it as the user who will be executing FlexDeploy and Influx.
If it is less that 65536, we recommend raising it.
sudo vi /etc/security/limits.conf
where oracle is the user logged into the box to run FlexDeploy:
oracle soft nofile 16384
oracle hard nofile 65536
Windows
Linux
- bolt-path: from <FLEXDEPLOY_HOME>/influxdb/data/influxd.bolt to <FLEXDEPLOY_HOME>/application/vsm/data/influxd.bolt
- engine-path: from <FLEXDEPLOY_HOME>/influxdb/data/engine to <FLEXDEPLOY_HOME>/application/vsm/data/engine
- sqlite-path: <FLEXDEPLOY_HOME>/influxdb/data/influxd.sqlite to <FLEXDEPLOY_HOME>/application/vsm/data/influxd.sqlite
Windows
- bolt-path: from <FLEXDEPLOY_HOME>\influxdb\data\influxd.bolt to <FLEXDEPLOY_HOME>\application\vsm\data\influxd.bolt
- engine-path: from <FLEXDEPLOY_HOME>\influxdb\data\engine to <FLEXDEPLOY_HOME>\application\vsm\data\engine
- sqlite-path: <FLEXDEPLOY_HOME>\influxdb\data\influxd.sqlite to <FLEXDEPLOY_HOME>\application\vsm\data\influxd.sqlite
Setup the config file for FlexDeploy to connect to influxdb.
Create the file <FLEXDEPLOY_HOME>/influxdb/config/fdinflux.config with the following contents, modifed appropriately for your install.Step 11. Start tomcat
If running FlexDeploy 6.0 or higher, do not use startup.sh as this will not start the influx database.
Once influx and tomcat servers are up, we need to run setup on the influx database.
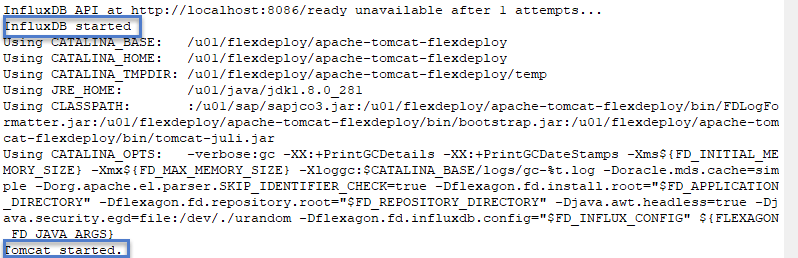
Linux
Windows

Note for Oracle XE Database
After starting your server, check the <FLEXDEPLOY_HOME>/apache-tomcat-flexdeploy/logs/flexdeploy.0.log file for the following error message:
- ORA-12519, TNS:no appropriate service handler found
-
Using SQLPlus update processes setting.
- alter system set processes=200 scope=spfile;
- Stop Tomcat
- Restart the XE Database
- Start Tomcat
Step 12. Launch FlexDeploy in your browser.
-
http://hostname:8000/flexdeploy
- Update hostname in URL to indicate host where FlexDeploy is installed.
- Update port if you had modified server.xml for different port number.
- You will need to complete Initial Registration process, where you will create admin user for login.
Step 13. Verification
Go to Administration - Plugins on FlexDeploy. Verify that Plugins are loaded. You should not see any files remaining in FD_APPLICATION_DIRECTORY**/plugins** folder after a few minutes.Step 14. FlexDeploy configuration
Now that you have installed FlexDeploy, let’s get start with configuration. You can do this in matter of minutes by using Blueprints concept, which is very simple configuration wizard for most common use cases.Related Topics
- Change FlexDeploy process user on Linux
- Enabling HTTPS on FlexDeploy (Tomcat)
- Security Hardening options for FlexDeploy
- Tuning Postgres for better performance if “cold” reads are slow
- FlexDeploy Backups Repository
- Using Amazon RDS for PostgreSQL with FlexDeploy
- Using FlexDeploy with a load Balancer that offloads HTTPS
- Using FlexDeploy to access external services through a proxy
- Doesn’t work - Running FlexDeploy as a service with systemctl